
Hey there welcome to AndroidPlus! Hope You liked our Classis Media Player AppTutorial. Today We Will See the Examples of Autocomplete Textview, List View And Theme in Android. We are learning about these because we could use these in an Android Application. So first let’s know what they are and why they are important to learn:
Autocomplete Textview:
We have seen in many website while filling a form list of suggestion are shown for some fields. For example: For a country field when we start typing, list of different countries are shown. See the image below:

Listview:

Listview is a view which shows the elements in list and can be scroll. You may have seen listview in your android mobile. For example the contacts list in your mobile is an example of listview.
Style and Theme:
Style is a collection of properties which fixes the design of a view or activity. Style is similar to CSS in website design. Theme is a style which applied on the full activity of an android application.

Now we know about the above terminology let’s start making App:
For today’s tutorial you need to create four activity and four XML files like shown in fig:

MainActivity:
In MainActivity.java we have just created three buttons to see the different examples. In java file add the following code:
package com.example.listview_example;
import android.os.Bundle;
import android.app.Activity;
import android.content.Intent;
import android.view.Menu;
import android.view.View;
import android.view.View.OnClickListener;
import android.widget.ArrayAdapter;
import android.widget.AutoCompleteTextView;
import android.widget.Button;
import android.widget.ListView;
public class MainActivity extends Activity {
Button b1, b2, b3;
@Override
protected void onCreate(Bundle savedInstanceState) {
super.onCreate(savedInstanceState);
setContentView(R.layout.activity_main);
b1 = (Button) findViewById(R.id.button1);
b2 = (Button) findViewById(R.id.button2);
b3 = (Button) findViewById(R.id.button3);
b1.setOnClickListener(new OnClickListener() {
@Override
public void onClick(View arg0) {
// TODO Auto-generated method stub
startActivity(new Intent(getApplicationContext(),
Example1.class));
}
});
b2.setOnClickListener(new OnClickListener() {
@Override
public void onClick(View arg0) {
// TODO Auto-generated method stub
startActivity(new Intent(getApplicationContext(),
Example2.class));
}
});
b3.setOnClickListener(new OnClickListener() {
@Override
public void onClick(View arg0) {
// TODO Auto-generated method stub
startActivity(new Intent(getApplicationContext(),
Example3.class));
}
});
}
}
In MainActivity.xml add the code given below:
<RelativeLayout xmlns:android="http://schemas.android.com/apk/res/android"
xmlns:tools="http://schemas.android.com/tools"
android:layout_width="match_parent"
android:layout_height="match_parent"
android:paddingBottom="@dimen/activity_vertical_margin"
android:paddingLeft="@dimen/activity_horizontal_margin"
android:paddingRight="@dimen/activity_horizontal_margin"
android:paddingTop="@dimen/activity_vertical_margin"
style="@style/my_theme"
tools:context=".MainActivity">
<Button
android:id="@+id/button2"
android:layout_width="wrap_content"
android:layout_height="wrap_content"
android:layout_below="@+id/button1"
android:layout_centerHorizontal="true"
android:layout_marginTop="21dp"
android:textColor="@android:color/white"
android:text="Example 2"
/>
<Button
android:id="@+id/button3"
android:layout_width="wrap_content"
android:layout_height="wrap_content"
android:layout_alignLeft="@+id/button2"
android:layout_below="@+id/button2"
android:layout_marginTop="18dp"
android:textColor="@android:color/white"
android:text="Example 3" />
<TextView
android:id="@+id/textView2"
android:layout_width="wrap_content"
android:layout_height="wrap_content"
android:layout_alignLeft="@+id/button2"
android:layout_below="@+id/textView1"
android:text="EXAMPLES"
android:textColor="@android:color/white"
android:textAppearance="?android:attr/textAppearanceMedium"/>
<Button
android:id="@+id/button1"
android:layout_width="wrap_content"
android:layout_height="wrap_content"
android:layout_alignLeft="@+id/textView2"
android:layout_below="@+id/textView2"
android:layout_marginTop="38dp"
android:textColor="@android:color/white"
android:text="Example1"/>
<TextView
android:id="@+id/textView1"
android:layout_width="wrap_content"
android:layout_height="wrap_content"
android:layout_alignParentTop="true"
android:layout_centerHorizontal="true"
android:layout_marginTop="30dp"
android:text="AUTOCOMPLETE TEXTVIEW"
android:textColor="@android:color/white"
android:textAppearance="?android:attr/textAppearanceMedium"/>
</RelativeLayout>
your layout should look like this:

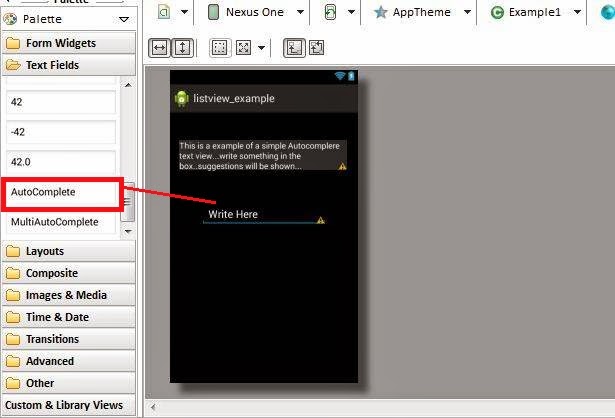
activity_example1.xml:
Add the following code in activity_example1.xml file. In this file we have only dragged the autocomplete textview from Textfields area in graphical layout.
<RelativeLayout xmlns:android="http://schemas.android.com/apk/res/android"
xmlns:tools="http://schemas.android.com/tools"
android:layout_width="match_parent"
android:layout_height="match_parent"
android:paddingBottom="@dimen/activity_vertical_margin"
android:paddingLeft="@dimen/activity_horizontal_margin"
android:paddingRight="@dimen/activity_horizontal_margin"
android:paddingTop="@dimen/activity_vertical_margin"
style="@style/my_theme"
tools:context=".Example1" >
<TextView
android:id="@+id/textView1"
android:layout_width="wrap_content"
android:layout_height="wrap_content"
android:layout_alignParentTop="true"
android:layout_centerHorizontal="true"
android:layout_marginTop="32dp"
android:textColor="@android:color/white"
android:text="This is a example of a simple Autocomplere text view...write something in the box..suggestions will be shown..." />
<AutoCompleteTextView
android:id="@+id/autoCompleteTextView1"
android:layout_width="wrap_content"
android:layout_height="wrap_content"
android:layout_below="@+id/textView1"
android:layout_centerHorizontal="true"
android:layout_marginTop="56dp"
android:textColor="@android:color/white"
android:ems="10"
android:text="Write Here" >
<requestFocus />
</AutoCompleteTextView>
</RelativeLayout>
Example1.java:
Add the code given below in Example1.java file. In this activity we have defined a string array names[].

In this code we have declared an array adapter to store the string array names[]. On typing in autocomplete textfield, the suggestions will be shown as a result.
package com.example.listview_example;
import android.os.Bundle;
import android.app.Activity;
import android.view.View;
import android.view.View.OnClickListener;
import android.widget.ArrayAdapter;
import android.widget.AutoCompleteTextView;
import android.widget.ListView;
public class Example1 extends Activity {
AutoCompleteTextView atv;
ListView lv;
String names[] = { "alex", "alan", "ankur", "anshul", "aish", "ansh",
"bhavesh", "bran", "bon", "bhavika", "briteney", "champ", "chitra",
"dang", "faiz", "fahran", "gauri", "gautam", "geeta", "hero",
"himesh", "himanshu", "illeana", "jeorge", "jim", "kavita",
"karan", "montu", "montek", "nikita", "neha", "priya", "piyush",
"pritam", "peter", "riya", "rohan", "ramsey", "seeta", "sneha",
"shikha", "shilpa", "tom", "tanshen", "urvashi", "xiomi", "zoro" };
@Override
protected void onCreate(Bundle savedInstanceState) {
super.onCreate(savedInstanceState);
setContentView(R.layout.activity_example1);
atv = (AutoCompleteTextView) findViewById(R.id.autoCompleteTextView1);
atv.setOnClickListener(new OnClickListener() {
@Override
public void onClick(View arg0) {
// TODO Auto-generated method stub
atv.setText("");
}
});
ArrayAdapter<String> adapter = new ArrayAdapter<String>(this,
android.R.layout.simple_expandable_list_item_1, names);
atv.setAdapter(adapter);
}
}
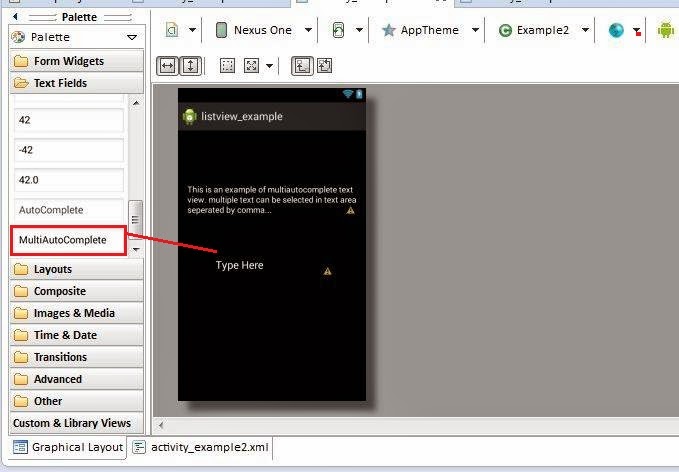
activity_example2.xml:
Add the following code in activity_example1.xml file. In this file we have dragged the multiautocomplete textview from Textfields area in graphical layout.
<RelativeLayout xmlns:android="http://schemas.android.com/apk/res/android"
xmlns:tools="http://schemas.android.com/tools"
android:layout_width="match_parent"
android:layout_height="match_parent"
android:paddingBottom="@dimen/activity_vertical_margin"
android:paddingLeft="@dimen/activity_horizontal_margin"
android:paddingRight="@dimen/activity_horizontal_margin"
android:paddingTop="@dimen/activity_vertical_margin"
style="@style/my_theme"
tools:context=".Example2" >
<MultiAutoCompleteTextView
android:id="@+id/multiAutoCompleteTextView1"
android:layout_width="wrap_content"
android:layout_height="wrap_content"
android:layout_alignParentLeft="true"
android:layout_centerVertical="true"
android:layout_marginLeft="36dp"
android:textColor="@android:color/white"
android:ems="10"
android:text="Type Here" />
<TextView
android:id="@+id/textView1"
android:layout_width="wrap_content"
android:layout_height="wrap_content"
android:layout_above="@+id/multiAutoCompleteTextView1"
android:layout_alignParentRight="true"
android:layout_marginBottom="68dp"
android:textColor="@android:color/white"
android:text="This is an example of multiautocomplete text view. multiple text can be selected in text area seperated by comma..." />
</RelativeLayout>
Example2.java:
Add the code given below in Example1.java file. In this activity we have defined a string array names[].

In this code we have declared an array adapter as we had defined in Example1.java activity but there is little difference since we have used multiautocomplete textview so many strings can be selected(which are separated by a comma) at a time.
package com.example.listview_example;
import android.os.Bundle;
import android.app.Activity;
import android.view.Menu;
import android.view.View;
import android.view.View.OnClickListener;
import android.widget.ArrayAdapter;
import android.widget.AutoCompleteTextView;
import android.widget.ListView;
import android.widget.MultiAutoCompleteTextView;
public class Example2 extends Activity {
MultiAutoCompleteTextView matv;
ListView lv;
String names[] = { "alex", "alan", "ankur", "anshul", "aish", "ansh",
"bhavesh", "bran", "bon", "bhavika", "briteney", "champ", "chitra",
"dang", "faiz", "fahran", "gauri", "gautam", "geeta", "hero",
"himesh", "himanshu", "illeana", "jeorge", "jim", "kavita",
"karan", "montu", "montek", "nikita", "neha", "priya", "piyush",
"pritam", "peter", "riya", "rohan", "ramsey", "seeta", "sneha",
"shikha", "shilpa", "tom", "tanshen", "urvashi", "xiomi", "zoro" };
@Override
protected void onCreate(Bundle savedInstanceState) {
super.onCreate(savedInstanceState);
setContentView(R.layout.activity_example2);
matv = (MultiAutoCompleteTextView) findViewById(R.id.multiAutoCompleteTextView1);
matv.setOnClickListener(new OnClickListener() {
@Override
public void onClick(View arg0) {
// TODO Auto-generated method stub
matv.setText("");
}
});
ArrayAdapter<String> adapter = new ArrayAdapter<String>(this,
android.R.layout.simple_dropdown_item_1line, names);
matv.setAdapter(adapter);
matv.setTokenizer(new MultiAutoCompleteTextView.CommaTokenizer());
}
}
activity_example3.xml:
Add the following code in activity_example1.xml file. In this file we have dragged the listview area in graphical layout of xml file.

<RelativeLayout xmlns:android="http://schemas.android.com/apk/res/android"
xmlns:tools="http://schemas.android.com/tools"
android:layout_width="match_parent"
android:layout_height="match_parent"
android:paddingBottom="@dimen/activity_vertical_margin"
android:paddingLeft="@dimen/activity_horizontal_margin"
android:paddingRight="@dimen/activity_horizontal_margin"
android:paddingTop="@dimen/activity_vertical_margin"
tools:context=".Example3" >
<ListView
android:id="@+id/listView1"
android:layout_width="match_parent"
android:layout_height="wrap_content"
android:layout_alignParentLeft="true"
android:textColor="@android:color/white"
android:layout_alignParentTop="true">
</ListView>
</RelativeLayout>
Example3.java:
Add the code given below in Example1.java file. In listview all the elements of the array names[] are shown.
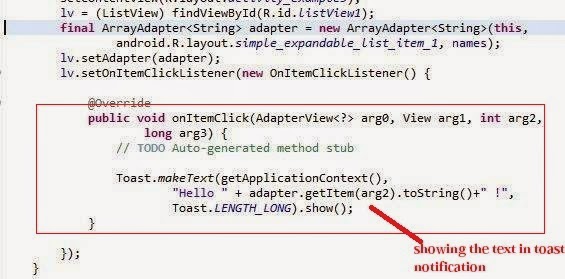
In this code we have declared an array adapter as we had defined in Example1.java file and a listview object lv. We have set onclick listener for the listview so on clicking any element of list the name of that element will be shown using toast notification.
package com.example.listview_example;
import android.os.Bundle;
import android.app.Activity;
import android.view.Menu;
import android.view.View;
import android.view.View.OnClickListener;
import android.widget.AdapterView;
import android.widget.AdapterView.OnItemClickListener;
import android.widget.ArrayAdapter;
import android.widget.ListView;
import android.widget.Toast;
public class Example3 extends Activity {
ListView lv;
String names[] = { "alex", "alan", "ankur", "anshul", "aish", "ansh",
"bhavesh", "bran", "bon", "bhavika", "briteney", "champ", "chitra",
"dang", "faiz", "fahran", "gauri", "gautam", "geeta", "hero",
"himesh", "himanshu", "illeana", "jeorge", "jim", "kavita",
"karan", "montu", "montek", "nikita", "neha", "priya", "piyush",
"pritam", "peter", "riya", "rohan", "ramsey", "seeta", "sneha",
"shikha", "shilpa", "tom", "tanshen", "urvashi", "xiomi", "zoro" };
@Override
protected void onCreate(Bundle savedInstanceState) {
super.onCreate(savedInstanceState);
setContentView(R.layout.activity_example3);
lv = (ListView) findViewById(R.id.listView1);
final ArrayAdapter<String> adapter = new ArrayAdapter<String>(this,
android.R.layout.simple_expandable_list_item_1, names);
lv.setAdapter(adapter);
lv.setOnItemClickListener(new OnItemClickListener() {
@Override
public void onItemClick(AdapterView<?> arg0, View arg1, int arg2,
long arg3) {
// TODO Auto-generated method stub
Toast.makeText(getApplicationContext(),
"Hello " + adapter.getItem(arg2).toString()+" !",
Toast.LENGTH_LONG).show();
}
});
}
}
Style.xml:
Open res->values->styles.xml file and add the code given below:

<resources xmlns:android="http://schemas.android.com/apk/res/android">
<!--
Base application theme, dependent on API level. This theme is replaced
by AppBaseTheme from res/values-vXX/styles.xml on newer devices.
-->
<style name="AppBaseTheme"parent="android:Theme.Light">
<!--
Theme customizations available in newer API levels can go in
res/values-vXX/styles.xml, while customizations related to
backward-compatibility can go here.
-->
</style>
<!-- Application theme. -->
<style name="AppTheme" parent="AppBaseTheme">
<!-- All customizations that are NOT specific to a particular API-level can go here. -->
</style>
<style name="my_theme" >
<!-- All customizations that are NOT specific to a particular API-level can go here. -->
<item name="android:background">@android:color/black</item>
<item name="android:textColor">@android:color/white</item>
<item name="android:textColorHighlight">@android:color/white</item>
</style>
In this file we have defined the different items as shown in fig:

And we have declare this style in each xml files (activity1.xml and so on).
AndroidManifest.xml:
Add the code given below in the androidmanifest.xml file:
<?xml version="1.0"encoding="utf-8"?>
<manifest xmlns:android="http://schemas.android.com/apk/res/android"
package="com.example.listview_example"
android:versionCode="1"
android:versionName="1.0" >
<uses-sdk
android:minSdkVersion="8"
android:targetSdkVersion="16"/>
<application
android:allowBackup="true"
android:icon="@drawable/ic_launcher"
android:label="@string/app_name"
android:theme="@style/AppTheme">
<activity
android:name="com.example.listview_example.MainActivity"
android:label="@string/app_name">
<intent-filter>
<action android:name="android.intent.action.MAIN"/>
<category android:name="android.intent.category.LAUNCHER"/>
</intent-filter>
</activity>
<activity
android:name="com.example.listview_example.Example1"
android:label="@string/title_activity_example1">
</activity>
<activity
android:name="com.example.listview_example.Example2"
android:label="@string/title_activity_example2">
</activity>
<activity
android:name="com.example.listview_example.Example3"
android:label="@string/title_activity_example3">
</activity>
</application>
</manifest>
Result:
Mainactivity:

Example1:

Example2:

Example3:

Also read: Android Classic Media Player App
Guys today we learned about Autocomplete textview, Listview and Style and Theme in Android. These are very basic things and beginners should learned them. Hope you followed the tutorials step by step and understood everything. For any query or suggestions please feel free to comment.
Post a Comment